

How To Check An Outlet With A Multimeter
Contents
- What is Grounding?
- 6 Stride Guide for Testing a Footing Wire with a Multimeter
- Footstep 1 – Ready Upwards the Multimeter
- Footstep two – Connect the Probes
- Step iii – Check the Reading Using Alive and Neutral Ports
- Pace 4 – Check the Voltage with the Globe Port
- Stride 5 – Compare All the Readings
- Step vi – Calculate the Total Leakage
- Automotive Electrical Basis Problems
- Quality Basis Betoken
- Apply a Multimeter to Check Footing
- Apply Larger Judge Wires
For whatsoever electrical wiring system, having a ground wire is vital. Sometimes, not having a footing wire tin cause disastrous outcomes for the whole excursion. That is why today, we look at how to test the ground with a multimeter.
In general, later setting the multimeter to the highest voltage settings, you lot tin can insert the probes to check hot, neutral, and ground wires and their voltages. Then you volition be able to make up one's mind if the outlet is grounded correctly or non. We will get into more depth beneath.
What is Grounding?
Before we get into our testing process, we demand to discuss the grounding. Without a proper understanding of the footing connection, moving forward is pointless. And so, here is a simple explanation for grounding.
The chief purpose of a ground connection is to transmit discharged electricity from an appliance or outlet into the footing. Therefore, no one volition get electrocuted because of the discharged electricity. For proper safety protocol having a working ground, wire is essential. You can use this process for your dwelling house or vehicle. (1)
6 Step Guide for Testing a Ground Wire with a Multimeter
In this section, we will discuss how to check the ground with a multimeter. Also, for this demonstration, we will use a typical business firm electrical outlet. The goal is to find if the outlet is grounded correctly or non. (two)
Step 1 – Set Up the Multimeter
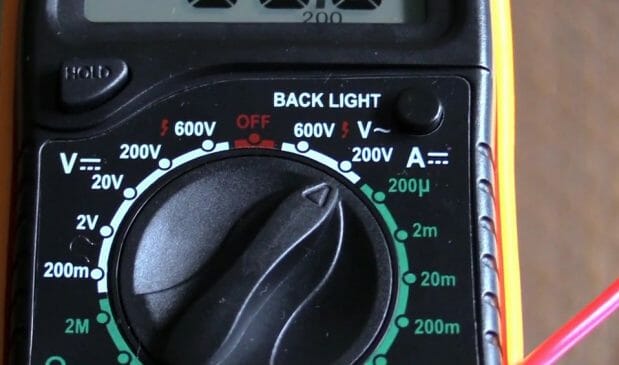
First, you should set the multimeter properly for the testing process. And then, set the multimeter to AC voltage mode. Nevertheless, if y'all use an analog multimeter, you should arrange the dial to the letter Five position.
On the other manus, if y'all are using a digital multimeter, you should navigate the settings until you discover the AC Voltage. After you locate it, set the cutoff value for the highest voltage. Remember, setting up the highest voltage will assist immensely in getting an accurate reading.
Nonetheless, some multimeters come without cutoff values. If that is the case, set the multimeter to AC voltage settings and commencement the test.
Stride 2 – Connect the Probes
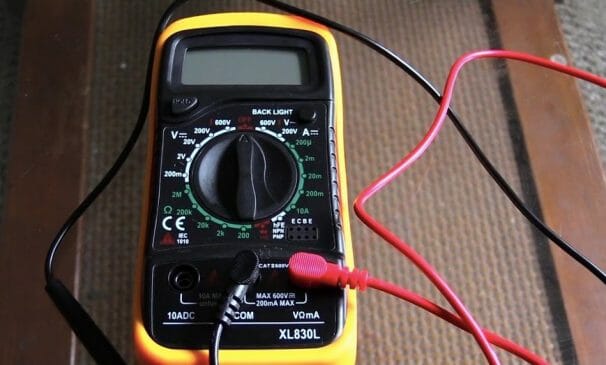
Yous can find two unlike-colored probes in your multimeter, blood-red and blackness. These two probes should connect properly to the multimeter ports. Therefore, attach the red probe to the port labeled as V, Ω, or +. Then, attach the black probe to the port labeled equally – or COM. Messing up the connection of these two probes and ports tin cause a brusque circuit situation in your multimeter.
Also, don't use probes that are damaged or cracked. Furthermore, avoid using probes with exposed wires because yous might get electrocuted while testing.
Footstep iii – Cheque the Reading Using Live and Neutral Ports
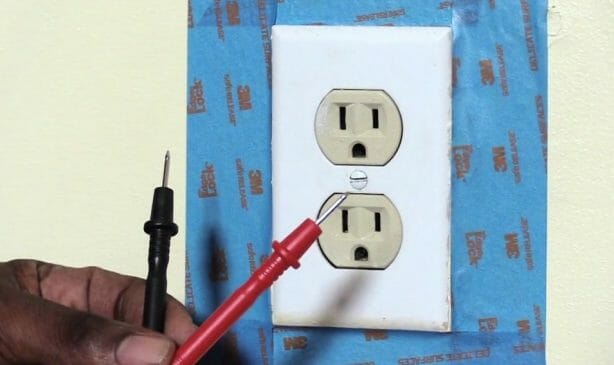
Now yous can check the ground wire using the multimeter. In this step, yous have to test the hot and neutral wires with the multimeter probes.
Earlier doing that, make certain to hold the probes from the insulation wrappers, this will protect you from whatsoever shocks.
And then push the reddish probe within the live port.
Accept the blackness probe and push it into the neutral port. Commonly, the smaller port is the alive port, and the larger port is the neutral port.
"However, if you cannot identify the ports, you can always follow the traditional method. Bring out the three wires, and and then with the dissimilar colors, you tin easily sympathize the wires.
Usually, the live wire is brown, the neutral wire is blueish, and the basis wire is yellow or green."
After pushing the ii probes inside the alive and neutral ports, check the voltage on the multimeter and notation it down.
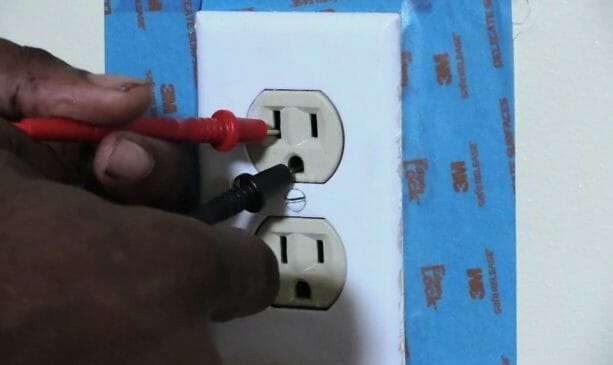
Step 4 – Bank check the Voltage with the Globe Port
At present you should check the voltage between the live and world ports. To do that, take out the cherry-red probe from the neutral port and carefully push button it inside the globe port. Practice not disconnect the blackness probe from the live port during this procedure. Globe port is a circular or U-shaped hole located at the lesser or top of the outlet.
Check the voltage reading on the multimeter and notation it down. Now compare this reading with the earlier reading.
If the outlet's connection is grounded, y'all volition get a reading equal to or within 5V. However, if the reading between the live and world port is zero or close to nada, that means the outlet is not grounded.
Step 5 – Compare All the Readings
For proper comparing, you will demand at least three readings. You already accept two readings.
Reading One: Live and neutral port reading
Reading Ii: Live and earth port reading
Now have the reading of the neutral port and world port. To do this:
- Button the ruby-red probe inside of the neutral port.
- Push the black probe inside of the earth port.
- Annotation down the reading.
You lot volition get a pocket-sized reading for these two ports. However, if your business firm connection is not grounded, there is no need to have the third reading.
Pace vi – Calculate the Total Leakage
If you lot followed Steps three,four, and v, at present you have three different readings. From these 3 readings, calculate the full leakage.
To find total leakage, subtract the commencement reading from the second reading. Then add the third reading to the resulted reading. If the last result is greater than 2V, you lot might be working with a faulty ground wire. If the result is less than 2V, the outlet is safe to use.
This is an fantabulous method to observe faulty basis wires.
Automotive Electrical Ground Problems
For any vehicle, several electrical problems can occur due to bad electric ground connections. Likewise, these issues might come in many forms such as dissonance in the audio arrangement, fuel pump issues, or messed-upwardly electronic engine controls. If yous tin can avoid these issues, it volition be groovy for y'all and your vehicle.
Here are some tips on how to prevent such a state of affairs.
Quality Ground Point
Most of us call up if somehow the basis wire contacts the vehicle, everything is grounded. But, this is not true. The footing wire should exist properly attached to the vehicle. For instance, select a signal that is gratis of paint and rust. Then make the connection.
Use a Multimeter to Bank check Ground
After attaching the basis wire, it is always ameliorate to check the ground connection. So, employ a multimeter for this process. Use the battery and the footing wire to determine the voltages.
Use Larger Gauge Wires
Depending on the amount of current, you might have to modify the approximate of the ground wire. Commonly, factory-fabricated wires have 10 to 12 gauges.
Below are another multimeter learning guides that you can also check.
- How to use a multimeter to test the voltage of live wires
- How to place neutral wire with a multimeter
- How to use a Cen-Tech digital multimeter to check voltage
References
(1) go electrocuted – https://www.mayoclinic.org/first-assistance/beginning-aid-electric-daze/basics/art-20056695
(ii) typical business firm – https://www.bhg.com/home-comeback/exteriors/curb-appeal/firm-styles/
Video Reference
Source: https://toolsweek.com/how-to-test-ground-with-multimeter/
0 Response to "How To Check An Outlet With A Multimeter"
Post a Comment